Managing Shift Plans
A shift plan is the central place where you organize your shifts. It is always assigned to a location and has no time limit. The location cannot be changed after creation.
How Does a Shift Plan Work?
A shift plan consists of work areas and shifts:
- Work areas define where work takes place (e.g., "Reception", "Laboratory", "Consultation Room")
- Shifts are the specific working hours – within a work area or without one
A shift can belong to a work area – or be created without one. Without a work area it applies to the whole practice (open to everyone) and appears in the "No department" section. So you don't strictly need a work area to schedule shifts; work areas just help you structure the plan.
Typical workflow:
- Create a shift plan (assign to a location)
- Add work areas (optional)
- Schedule shifts – in a work area, for a practitioner, or without a work area
For more information on managing work areas, see Work Areas.
Views
The shift plan offers three different views that you can switch between using the tabs above the calendar. Each view is optimized for different tasks.
Employee View
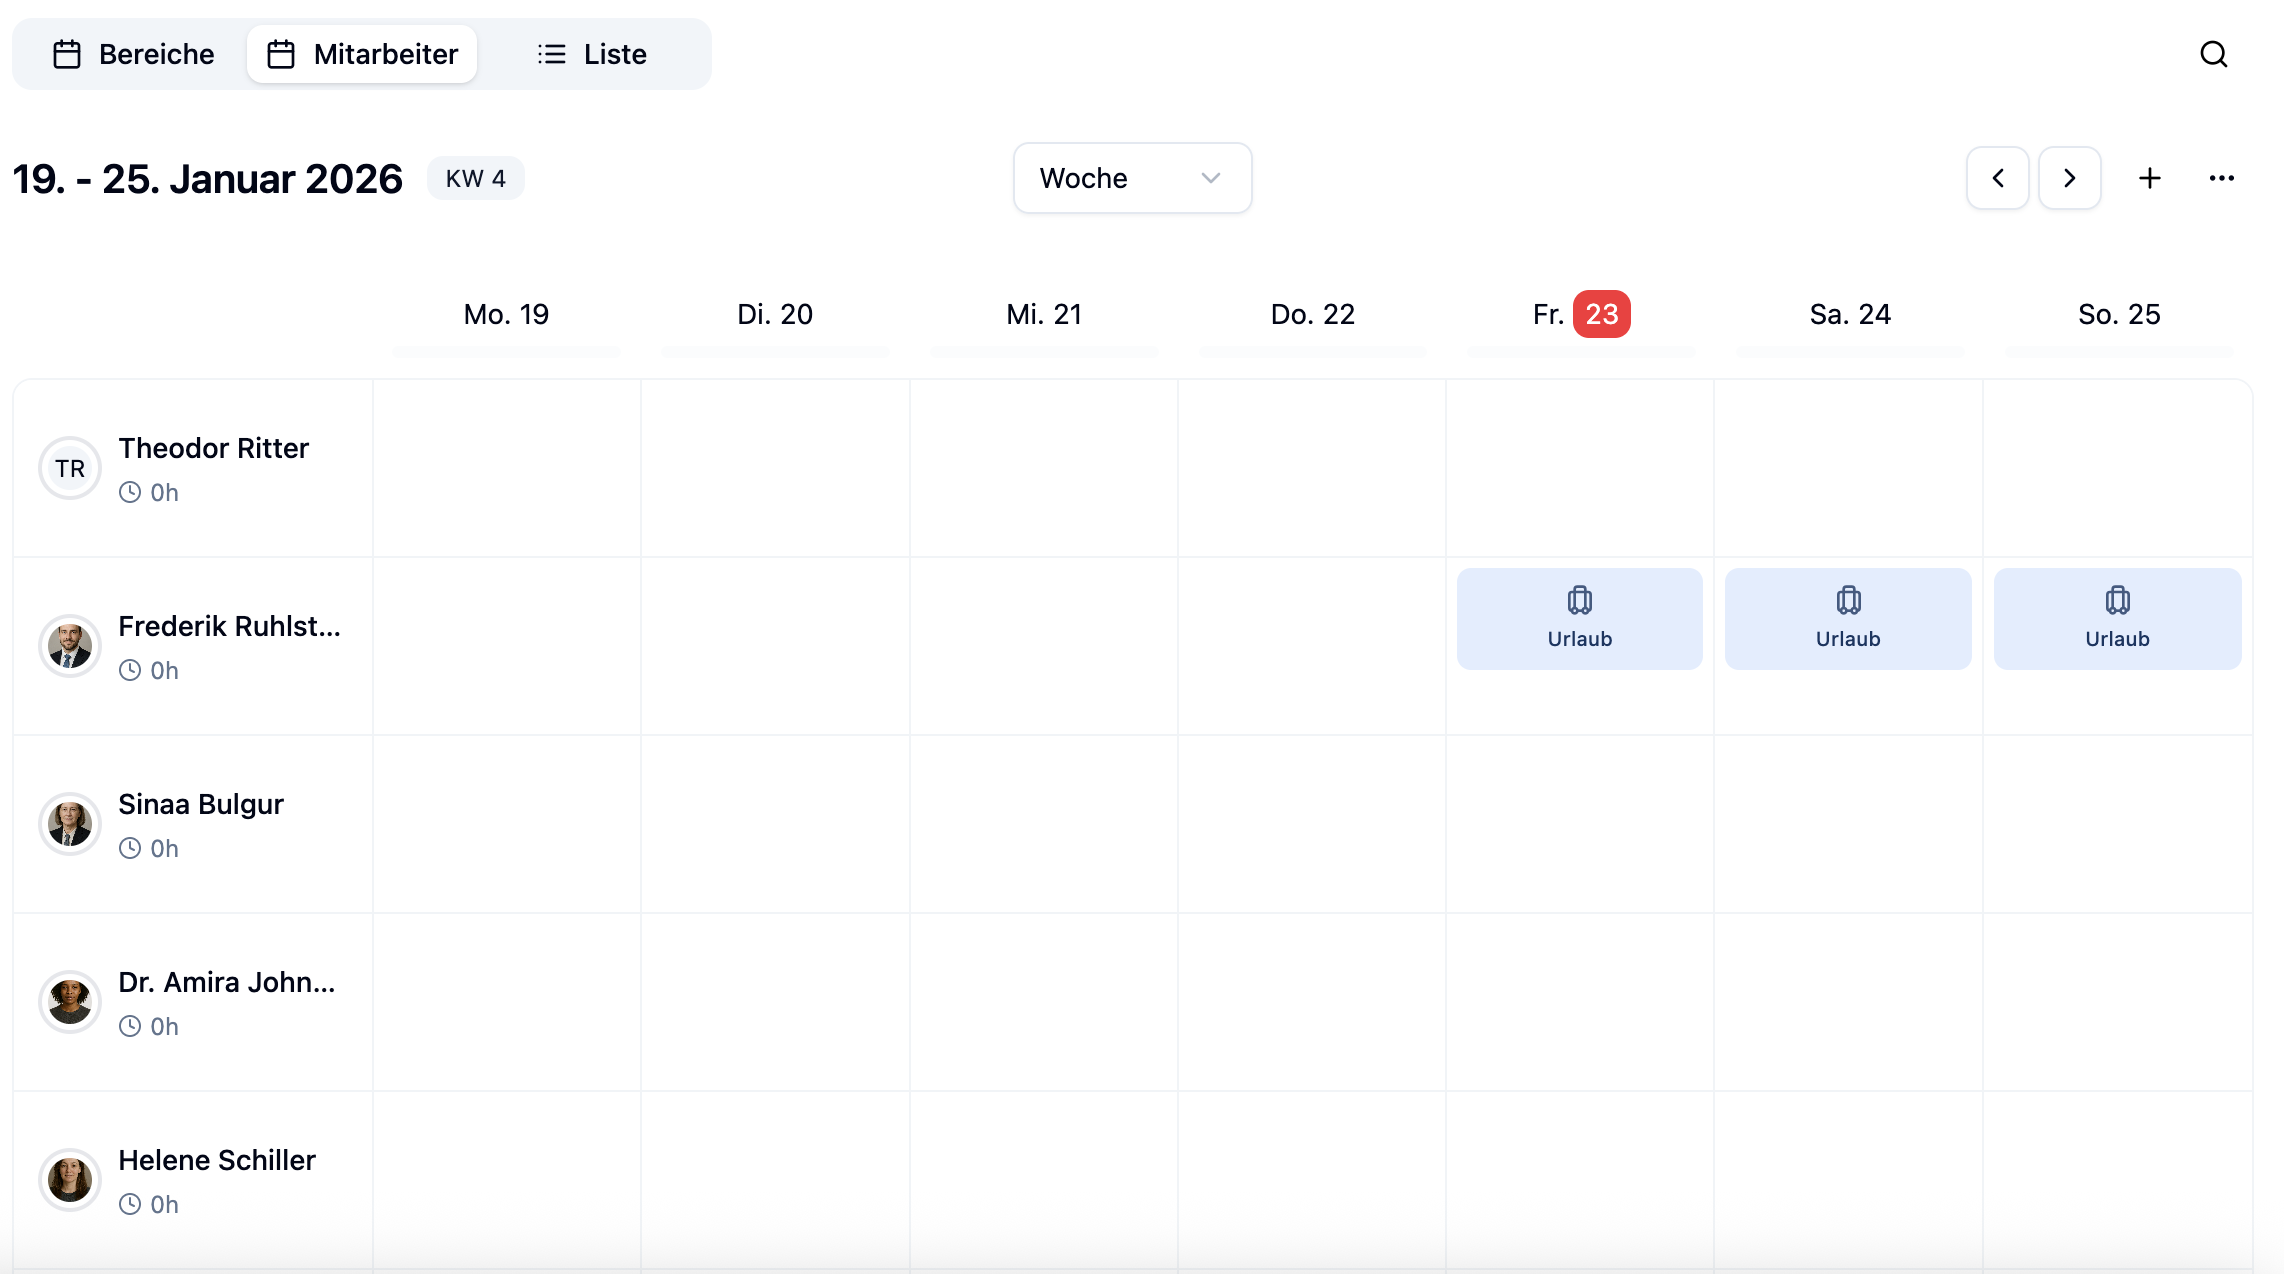
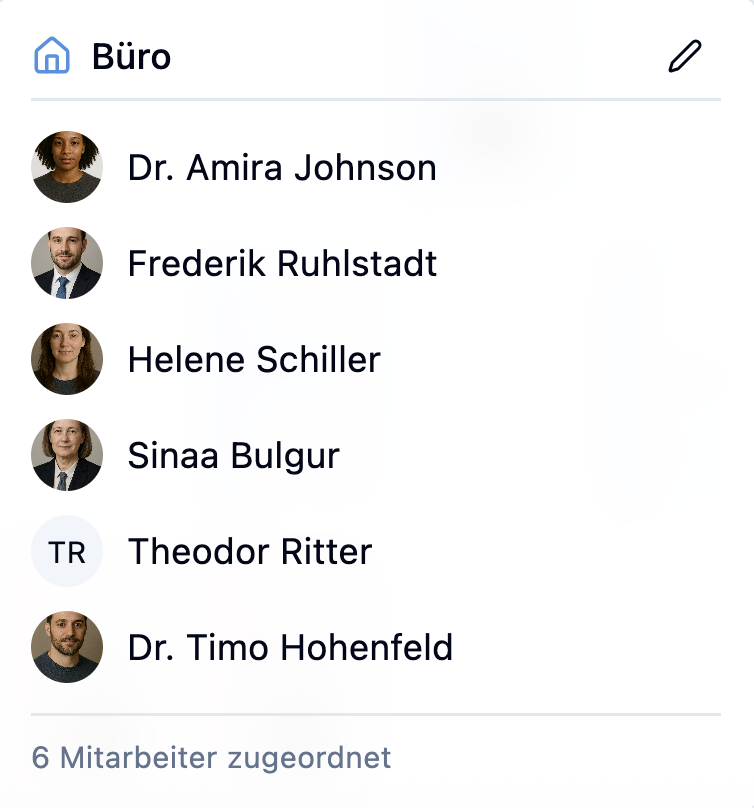
The employee view shows the shift plan grouped by employees. Each row represents an employee with their shifts throughout the week.
Employees whose home location is this location appear automatically in the employee view. An employee from another location only shows up once they have a shift in this shift plan — they then appear in the "Employees from other locations" section.
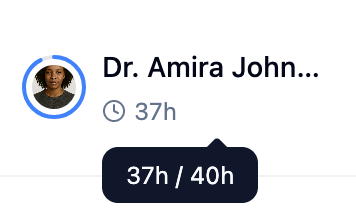
Next to each employee, you can see the weekly hours they are scheduled for this week. The colored circle around the avatar shows the status at a glance:
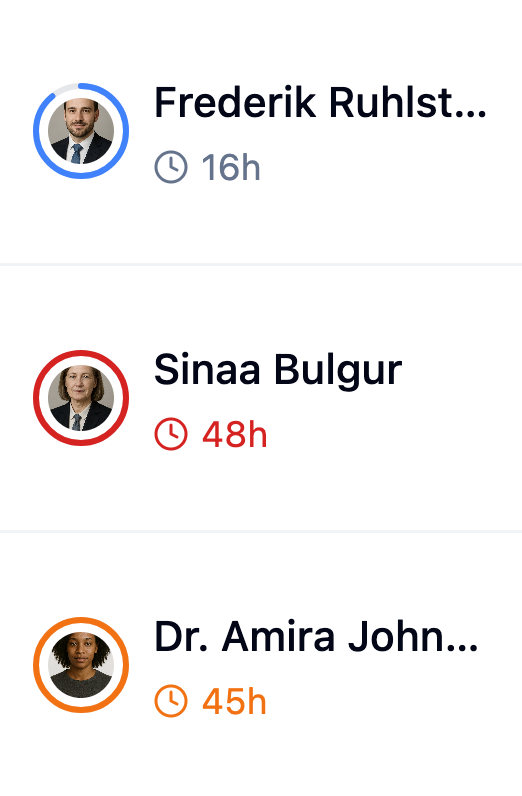
| Circle | Meaning |
|---|---|
| Blue | Employee is at or under their weekly hours |
| Yellow | Employee is slightly over their weekly hours |
| Red | Employee is significantly over their weekly hours |
When you hover over the hours, a tooltip shows the configured weekly hours and actual scheduled hours – provided you have set weekly hours for the employee.
Ideal for:
- Overview of individual employee working hours
- Checking if employees are evenly distributed
- Quickly assigning shifts to specific people
Situation: You want to check if employees are scheduled for too many hours.
Steps:
- Switch to the Employee View
- Look at the colored circles around the employee avatars
- Yellow circles indicate slight overtime
- Red circles indicate significant overtime
- Hover over the hours to see details
Result: You can immediately see which employees should be relieved.
Work Area View
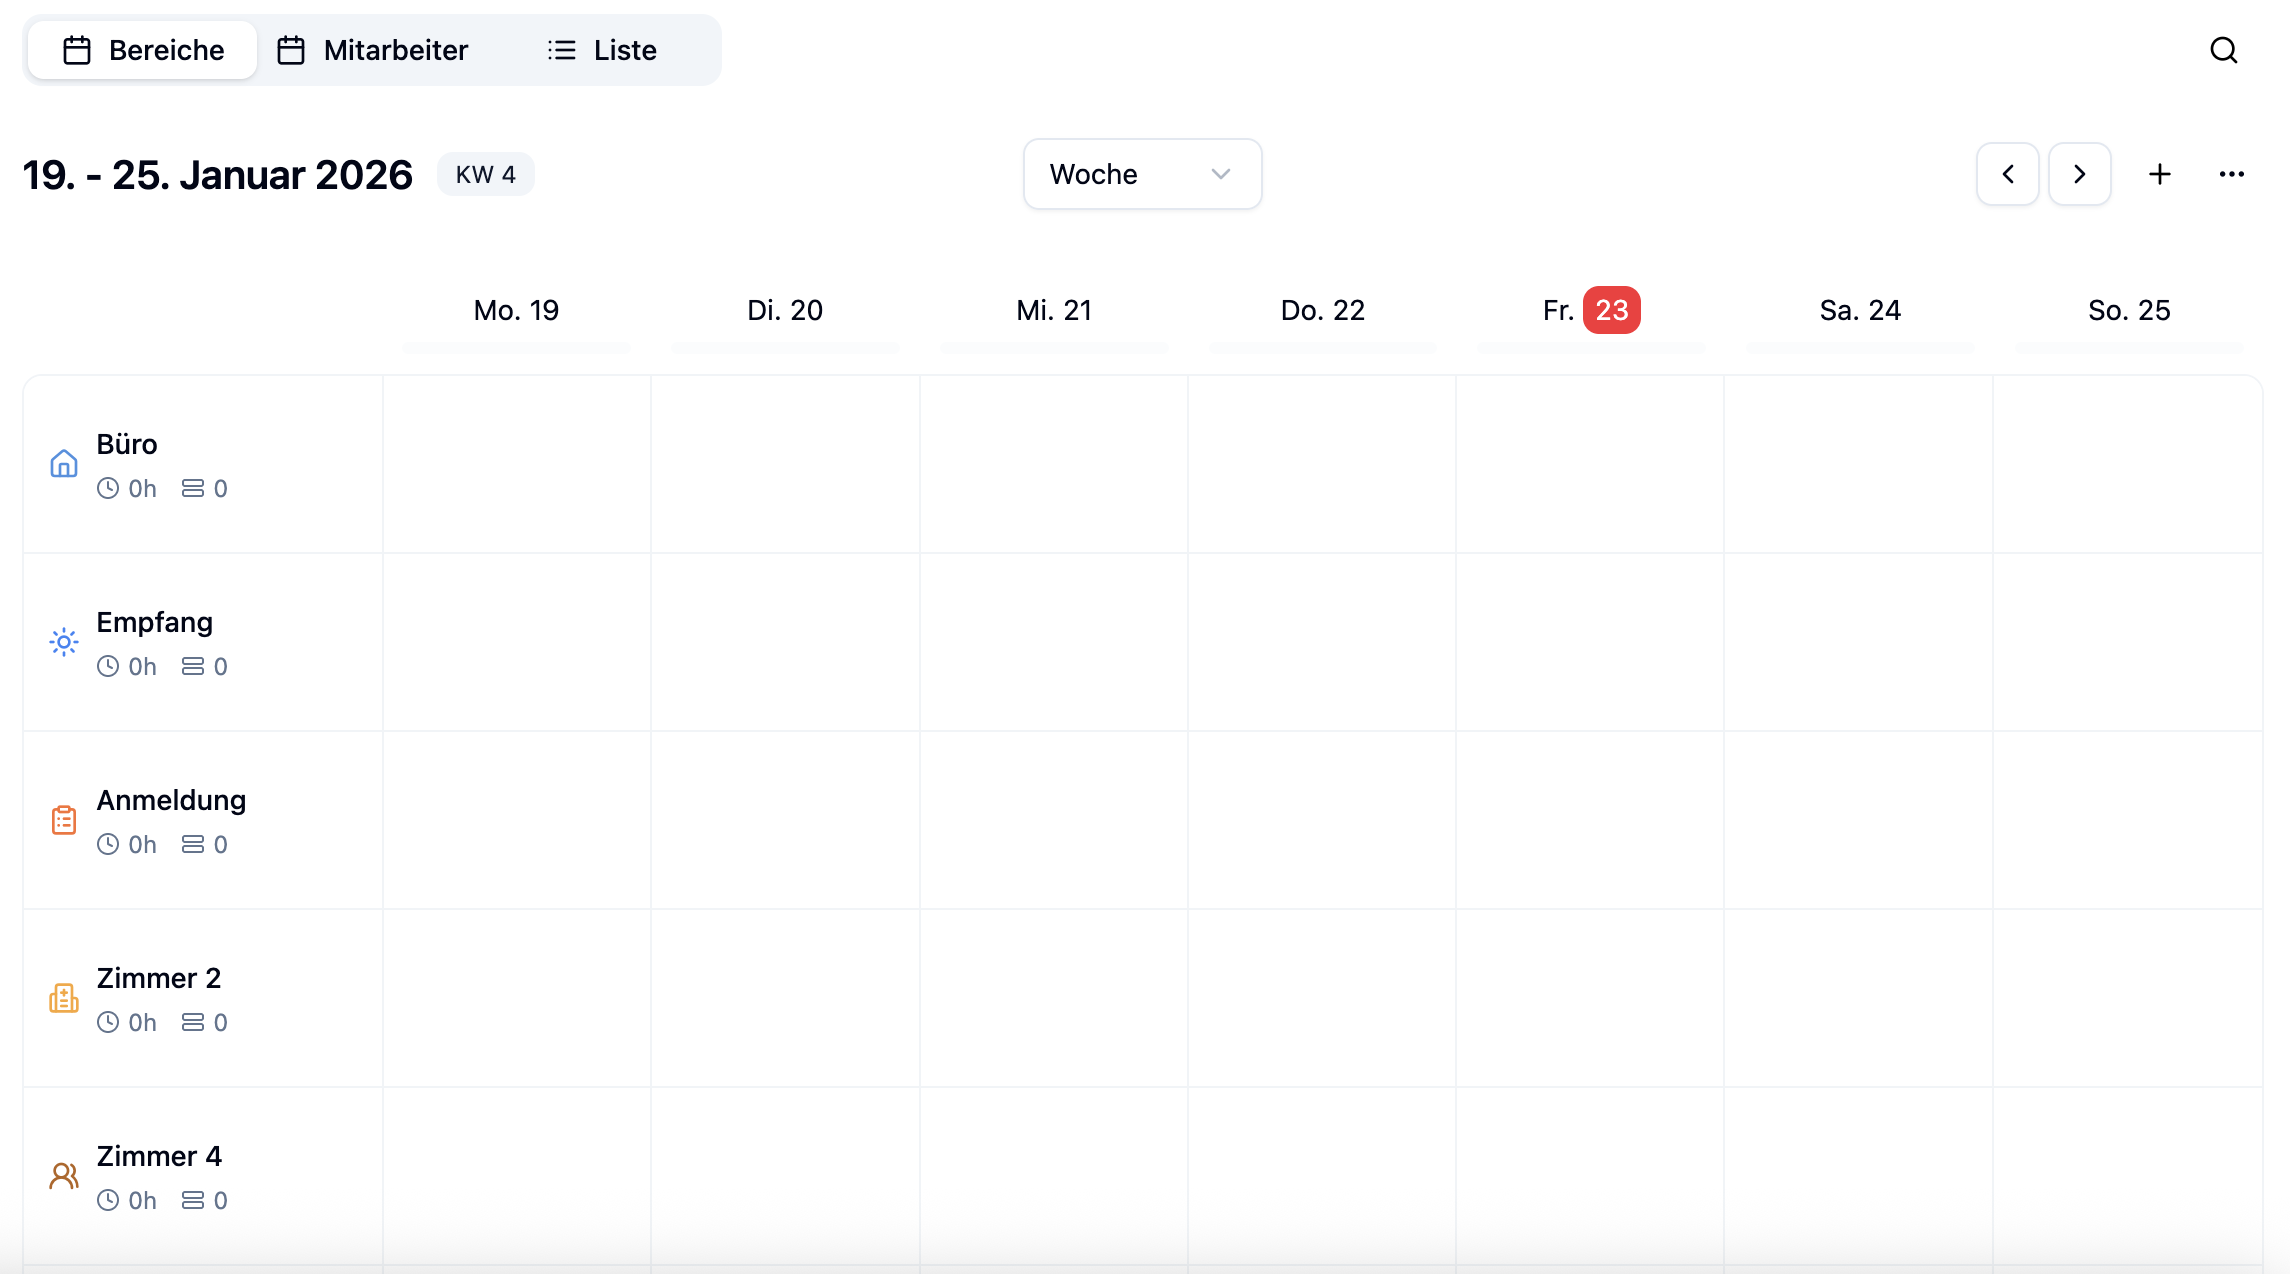
The work area view shows the shift plan grouped by work areas. Each row represents a work area with all its shifts.
Ideal for:
- Overview of staffing per work area
- Ensuring all areas are covered
- Planning with multiple stations or departments
List View
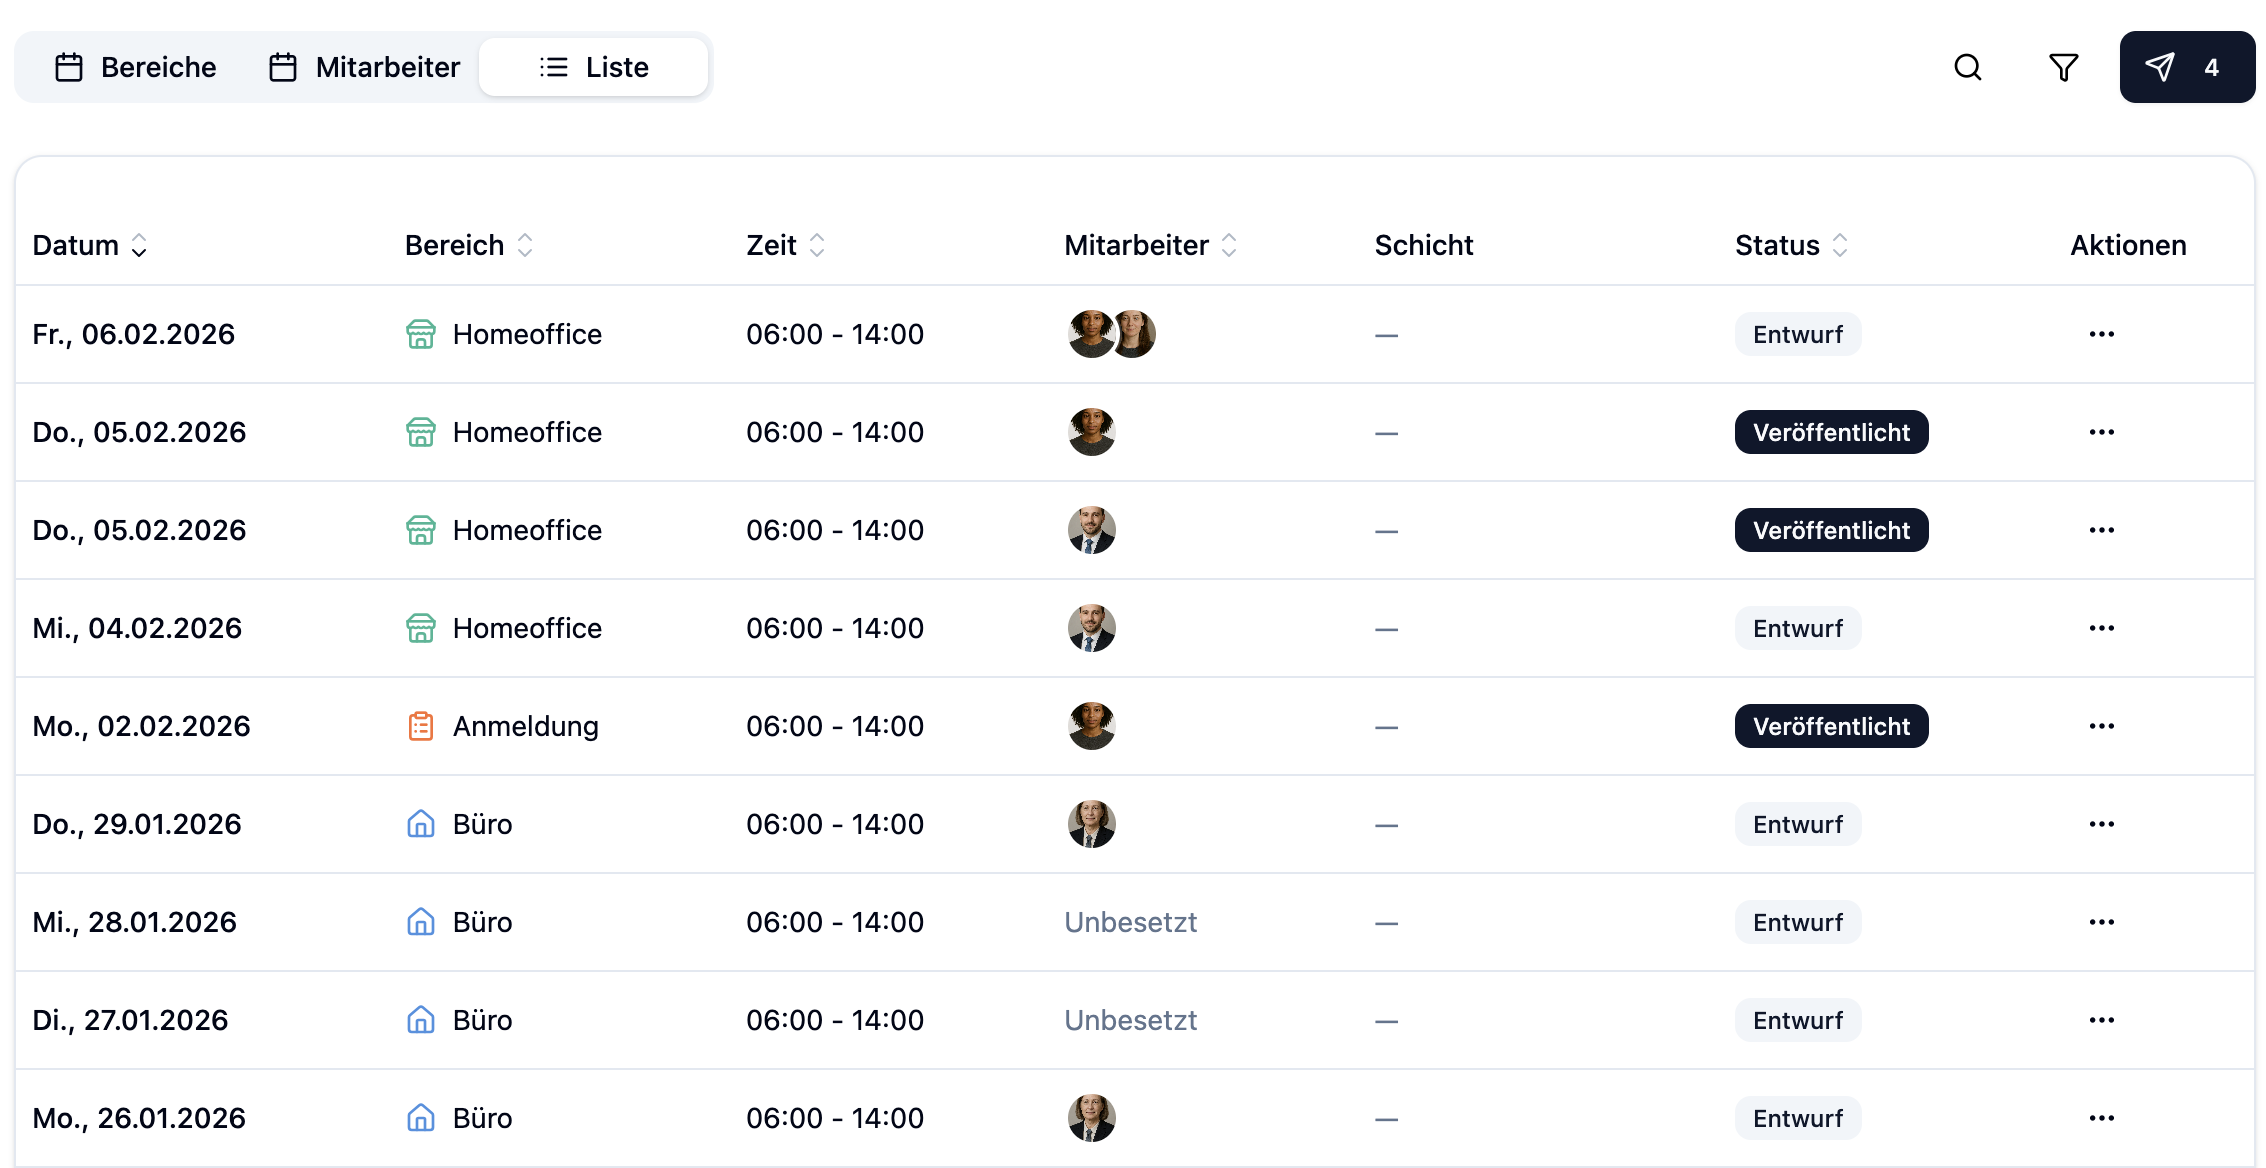
The list view shows all shifts as a chronological list. Unlike the other views, you see all shifts listed one below the other.
Using the filter icon in the top right next to the search, you can filter the list by various criteria.
Ideal for:
- Quick overview of all shifts for a day
- Exporting or printing shifts
- Detailed view of all shift information
- Employee view: When you want to know who works when
- Work area view: When you want to know which areas are staffed
- List view: When you want to see all shifts in a compact format
Navigation
Switching Between Weeks
You can navigate between weeks in two ways:
Arrow buttons: Click the arrows (← →) next to the week display to switch to the previous or next week.
Calendar: Click the week display between the arrows to open a calendar. Click on any day there, and the shift plan automatically jumps to that week.
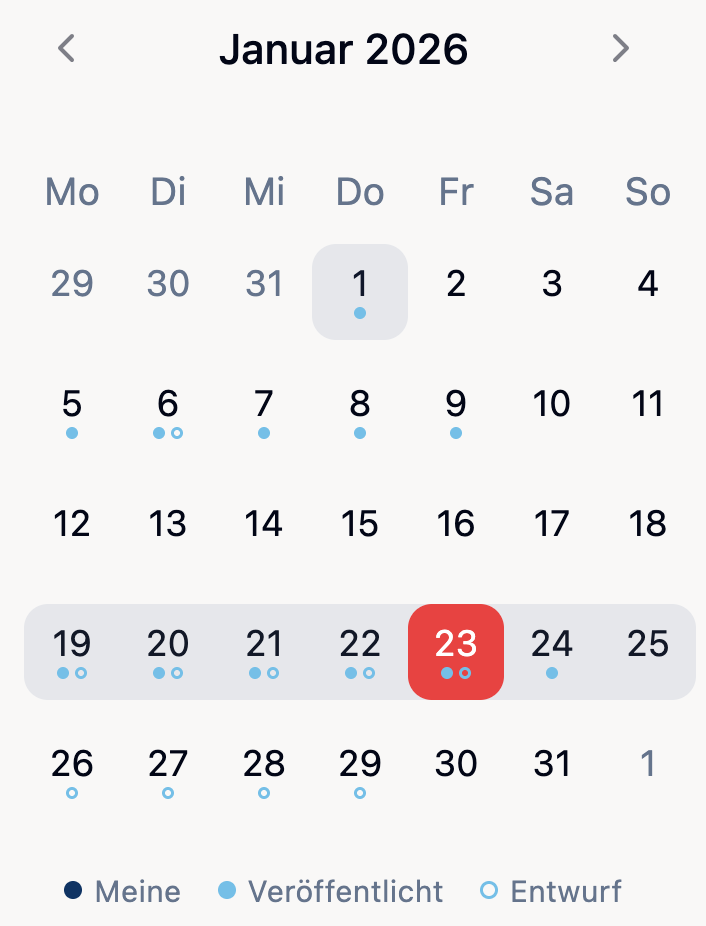
Dots in the Calendar
In the calendar, you'll see dots under certain days. These give you an at-a-glance view of the shift status:
| Dot | Meaning |
|---|---|
| Dark blue (filled) | You have your own shifts on this day |
| Light blue (filled) | There are published shifts |
| Light blue (outline) | There are unpublished shifts (draft) |
| No dot | No shifts on this day |
Click Today next to the arrow buttons to quickly return to the current week.
Functions
The Week Menu
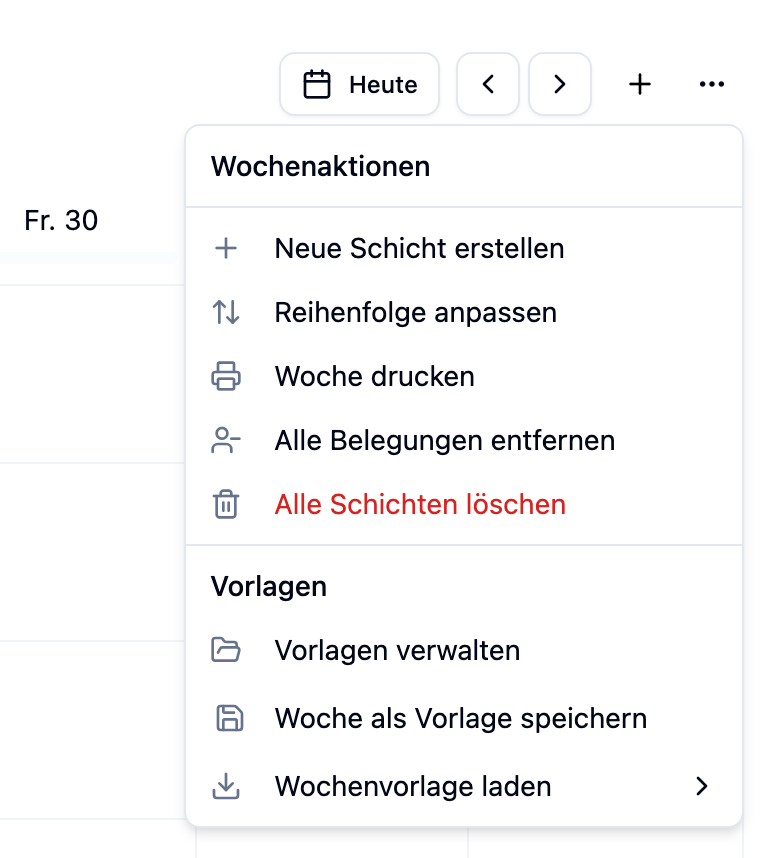
Most configuration options are found in the week menu. Open it by clicking the three-dot icon (⋯) in the top right corner of the week view.
Adjust Work Area Order
With Adjust order, you can change the sorting of work areas in your shift plan. The order determines how work areas are displayed in the week view.
A side panel opens where you can drag & drop the work areas into the desired order.
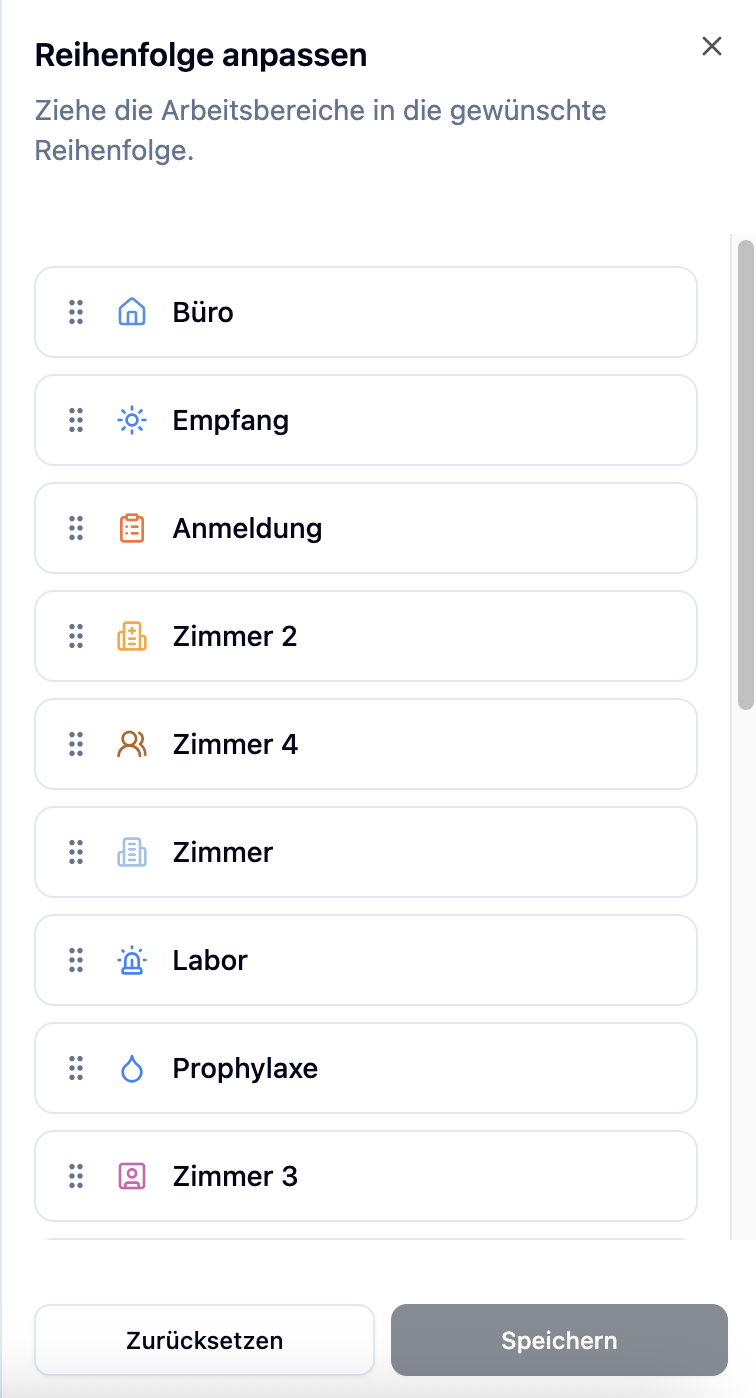
Sorting work areas is available from the Plus plan.
Adjust Employee Order
In the employee view, you can also use Adjust order to change the sorting of employees in your shift plan. The order determines how employees are displayed in the week view.
A side panel opens where you can drag & drop the employees into the desired order.
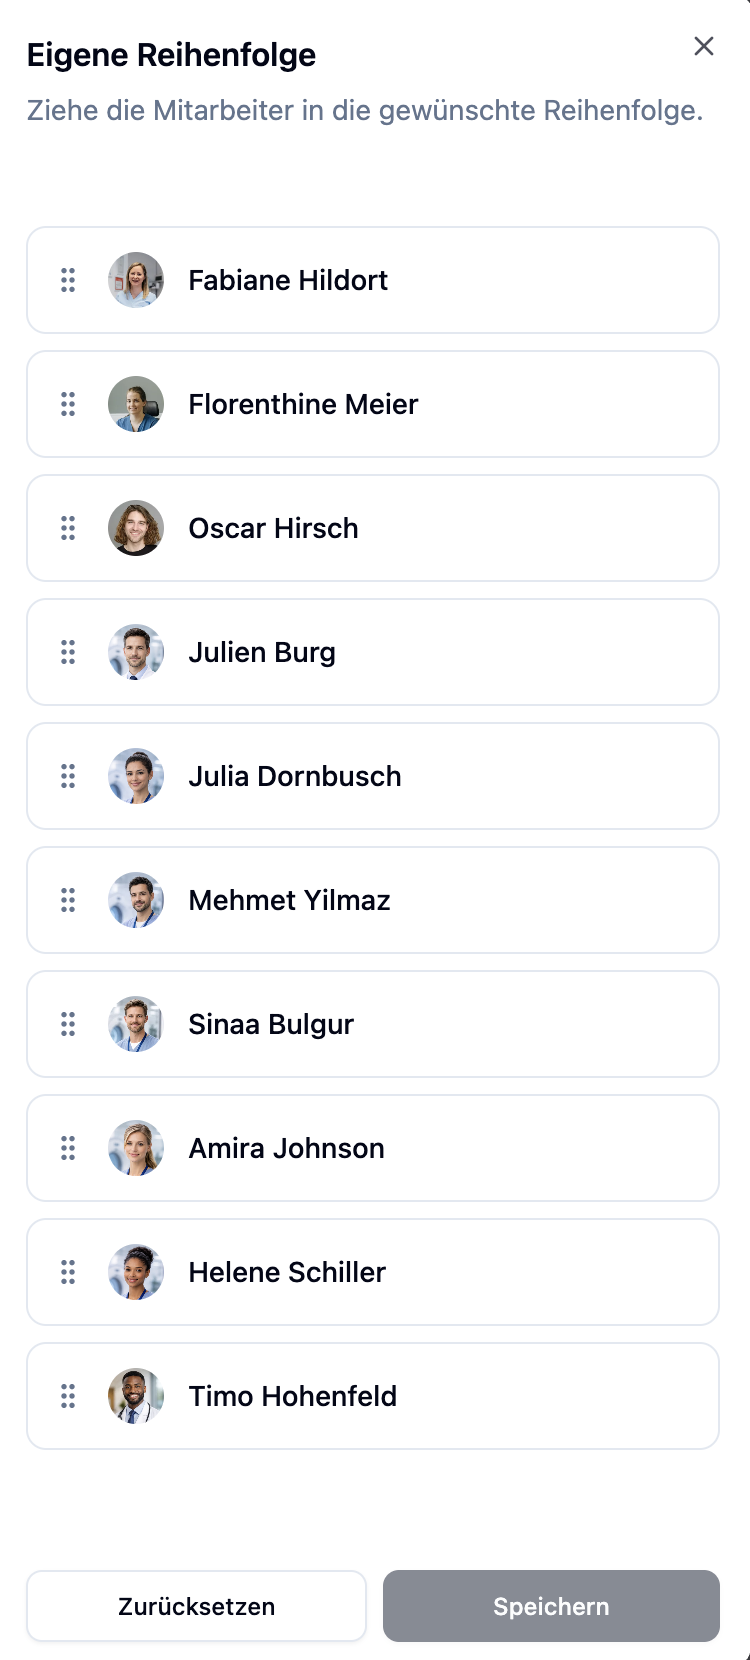
Sorting employees is available from the Plus plan.
Edit Work Areas
In the work area view, you can edit work areas directly. Hover over a work area – a tooltip with an edit icon appears. Click on it to open the work area.
Here you can change the name and add employees. For more details on managing work areas, see Work Areas.
Holidays

Holidays are automatically displayed in the shift plan. Which holidays appear depends on your location's configuration. You can set up holidays in the Location Settings.
Absences
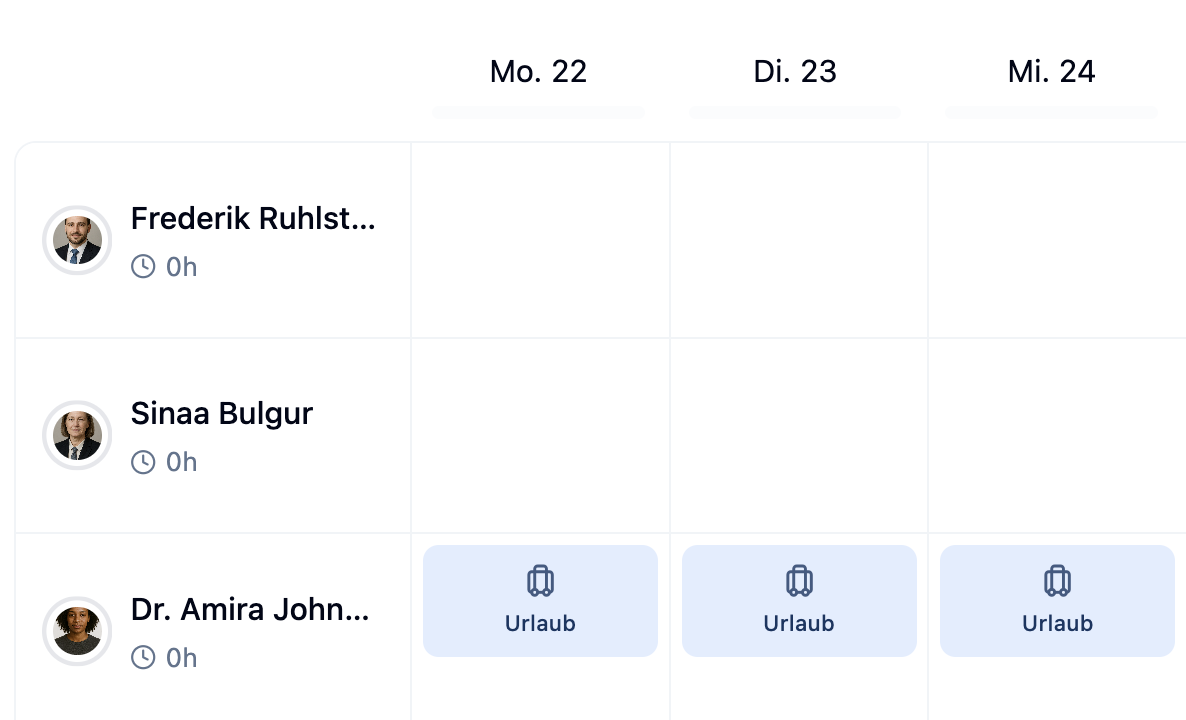
In the employee view, absences (e.g., vacation, sick leave) are displayed as colored cards directly in the shift plan. This gives you an immediate overview of which employees are unavailable on which days.
Search Shift Plan
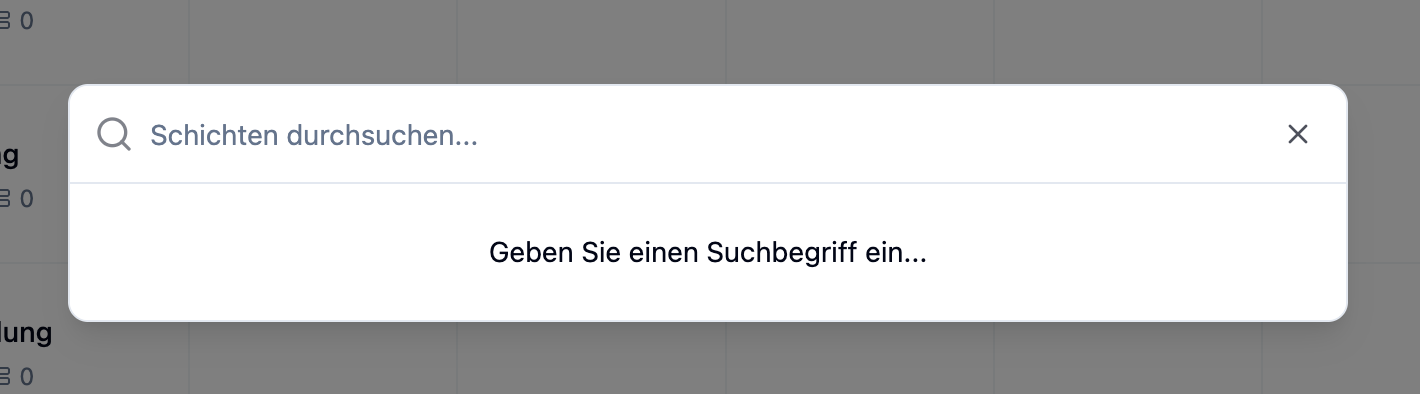
The search function helps you quickly find shifts or employees in your shift plan. Open the search via the magnifying glass icon or the shortcut ⌘K (Mac) or Ctrl+K (Windows).
Press ⌘K (Mac) or Ctrl+K (Windows) to open the search from anywhere in the shift plan.
Status Bar

The status bar gives you an at-a-glance overview of how well your week is staffed. For each day, you can see how that day is staffed. You'll find the status bars above each day column.
| Color | Status | Meaning |
|---|---|---|
| Green | Fully staffed | All required employees are assigned |
| Yellow | Partially staffed | Some positions are still open |
| Red | Unstaffed | No employees assigned |
Situation: You want to ensure all days are adequately staffed.
Steps:
- Look at the status bar above the calendar
- Each day shows a bar that can be partially green, yellow, and red – or one color for the entire day
- Hover over a day to see the number of shifts per status (fully staffed, partially staffed, unstaffed)
- Click on a day with yellow or red portions to check the shifts
Result: You quickly find the days where employees are still needed.
Print Shift Plan
Use Print week to create a print-optimized version of your shift plan. You can print it or save it as a PDF.
Depending on the current view, different layouts are printed:
| View | Description |
|---|---|
| Employee view | Shows all shifts grouped by employees |
| Area view | Shows shifts grouped by work areas |
The print function is available from the Plus plan.
Remove All Assignments
With Remove all assignments, all employee assignments for the current week are deleted. The shifts themselves remain – only the assigned employees are removed.
This action cannot be undone.
Delete All Shifts
With Delete all shifts, all shifts for the current week are permanently deleted.
This action deletes all shifts for the week and cannot be undone.
Multiple Shift Plans
You can create multiple shift plans for each location – for example, one for the main office and one for a branch.
Create a New Shift Plan
- Go to Shift Plan in the main menu
- Click the + symbol next to the shift plan selection
- Enter a name for the new shift plan
- Click Create Shift Plan
All shift plans within a location share the same work areas. When you create a new work area, it becomes available in all shift plans at that location.
Summary
| Function | Description | Availability |
|---|---|---|
| Views | Employee, work area, and list view | All plans |
| Navigation | Switch weeks via arrows or calendar | All plans |
| Week menu | Central configuration options | All plans |
| Adjust order | Adjust the order of work areas and employees | Plus |
| Search | Find shifts and employees (⌘K) | All plans |
| Status bar | Overview of staffing levels | All plans |
| Output week as print version | Plus | |
| Remove assignments | Delete all employee assignments | All plans |
| Delete shifts | Remove all shifts for the week | All plans |
| Multiple shift plans | Separate plans per location | All plans |
Frequently Asked Questions
Can I change the location of a shift plan after creation?
No. The location is set when the shift plan is created and cannot be changed afterwards. If you need a shift plan for a different location, create a new shift plan.
How can I see which employees are available?
When assigning a shift, you can see in the employee selection which employees are available. Employees with absences, unavailabilities, or existing shifts are marked accordingly. With the Premium plan, additional warnings are displayed through the Rule System.
What do the colored circles around employee avatars mean?
The circles show the weekly hours status:
- Blue: Employee is at or under their weekly hours
- Yellow: Employee is slightly over their weekly hours
- Red: Employee is significantly over their weekly hours
How do I publish a shift plan?
A shift plan itself doesn't need to be published – only the shifts within it. Shifts are created as drafts by default and must be actively published to be visible to employees. Learn more under Managing Shifts.
Can I duplicate a shift plan?
Not directly. However, you can create a weekly template from an existing week and apply it to other weeks.
Why is an employee not displayed in the employee view?
Employees of this location (their home location) appear automatically in the employee view. An employee from another location only appears once you assign them a shift in this shift plan — after that you'll find them in the "Employees from other locations" section.