Managing Shifts
After creating your shift plan, you can add and manage shifts. This page explains the key features: creating shifts, shift status, publishing, drag & drop, copying, quick assign, and open shifts.
Creating Shifts
There are three ways to create a new shift:
- Plus on a day – Click the + in an empty day cell
- Plus on a shift – Click the + on an existing shift
- Plus top right – Click the + in the top right corner of the shift plan
After clicking, the shift dialog opens where you can set times, work area, and employees.
Managing Breaks
Breaks are configured directly inside the shift — there is no separate breaks area. When you create or edit a shift, the dialog has a Break length field in minutes (preset options: 15, 30, 45, 60 min, or a custom value from 1 to 480).
The break is subtracted from the planned hours and reflected in the overtime account: the hours you see in the plan are already gross minus break.
Where can you change breaks?
- When creating a shift — the shift dialog includes a Break field with default options.
- When editing an existing shift — double-click the shift to reopen the dialog with the same field.
- Via shift templates — the template stores the break length so every shift created from it inherits the same value.
Filling Out Shift Details
When you open the shift dialog, the Shift Details tab is active. Here you enter all the key information for the shift.
| Field | Type | Required | Notes |
|---|---|---|---|
| Department | Select | No | Optional – without a work area the shift applies to the whole practice; the choice filters the employee list |
| Date | Date picker | Yes | Day of the shift |
| Time | Start and end time (HH:MM) | Yes | Two fields separated by "to" |
| Break | Select (None, 15, 30, 45, 60 min) | No | Custom value from 1–480 min available |
| Title | Text | No | Optional name, e.g. Morning or Late shift |
| Employees | Multi-select | No | Shows availability, weekly hours, and double-booking hints; filtered by department |
| Employees can register | Checkbox | No | Turns this into an open shift and reveals the required count field |
| Required staff count | Number (≥ 0) | Only for open shifts | How many people the shift needs |
| Shift note | Text area | No | Additional info for the team |
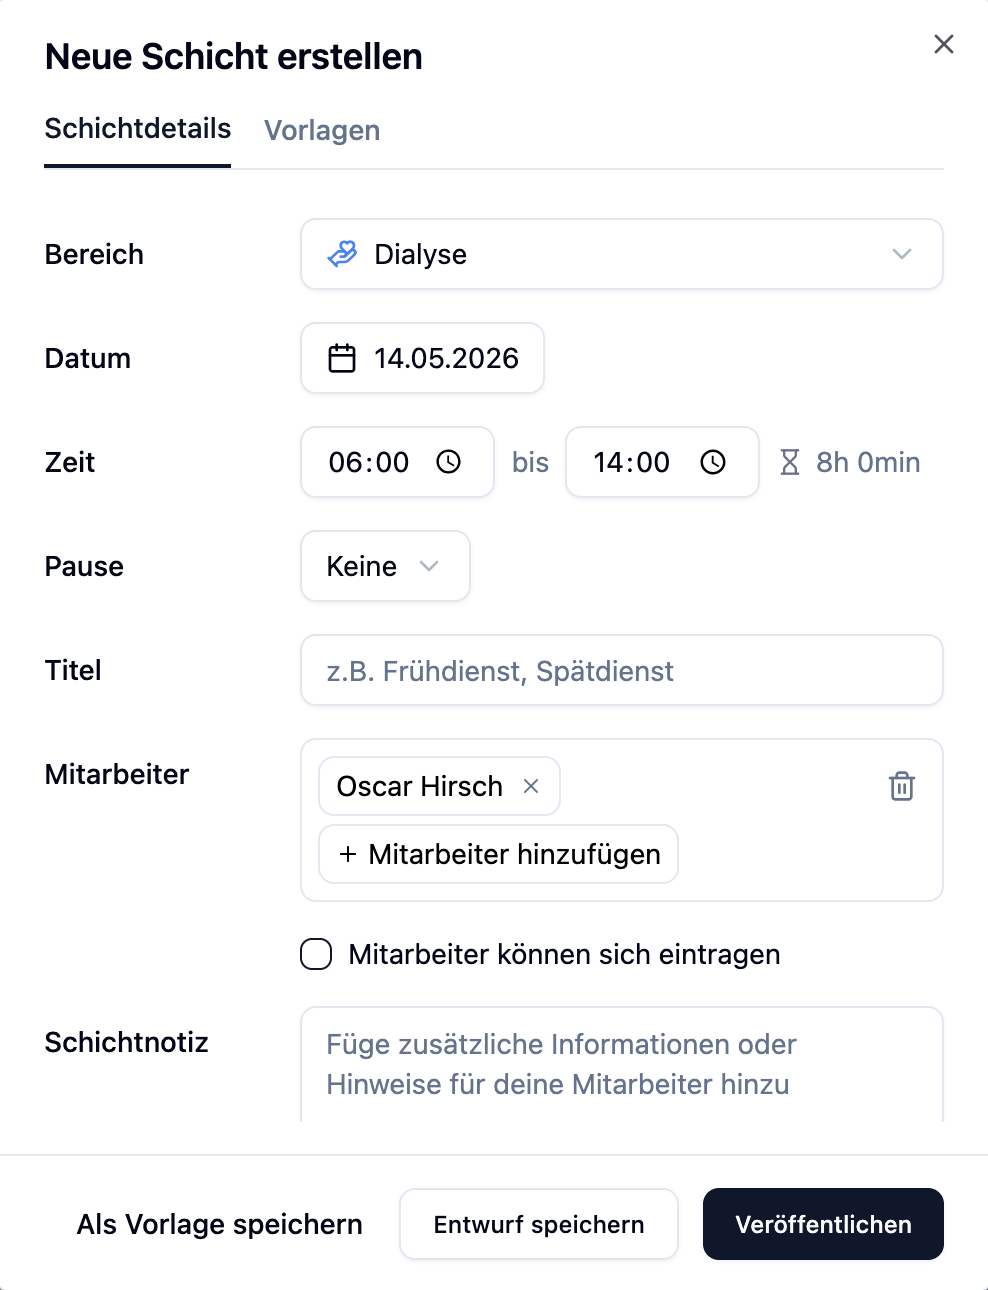
The employee selector shows directly who is available during the time slot and how many weekly hours are already planned.
You don't have to enter recurring shifts by hand every time. Create a shift template and apply it with one click.
Shift History
Shift history is available from the Plus plan.
The tab only appears when you open an existing shift. It is not visible when creating a new shift. Access is also limited to admins.
The shift history logs every change made to a shift, so you can always trace who changed what and when.
How to Open the History
- Click on an existing shift in the schedule
- In the shift dialog, switch to the Shift History tab
- You see all events, newest first
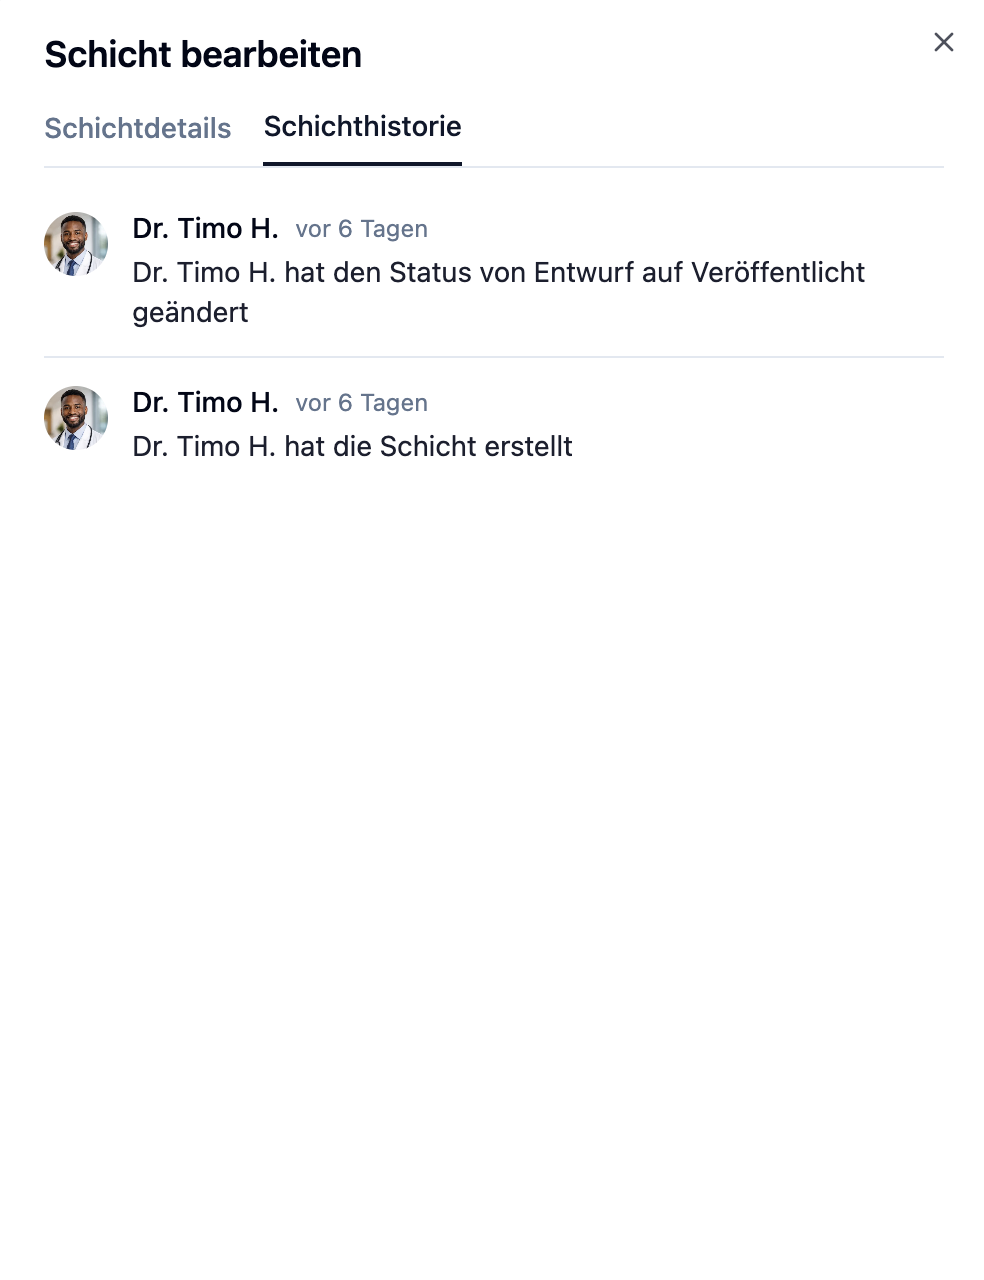
Structure of an Entry
| Element | Description |
|---|---|
| Avatar & name | Who made the change |
| Timestamp | Relative time, e.g. 2 hours ago |
| Action | Short description of the event |
| Detail line | Optional second line with extra info (e.g. new title or new note) |
Which Events Are Logged
| Group | Examples |
|---|---|
| Shift changes | Shift created or deleted, date, time, break, or department changed |
| Employee changes | Employee assigned, removed, or swapped |
| Status & open shift | Published, set back to draft, open shift enabled |
| Replacement requests | Request sent, accepted, rejected, withdrawn, or expired |
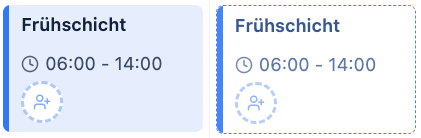
Shift Status: Draft & Published
Every shift has a status that determines who can see it.
| Status | Visibility | Appearance |
|---|---|---|
| Draft | Admins only | White card with dashed border |
| Published | All employees | Colored card (department color) |
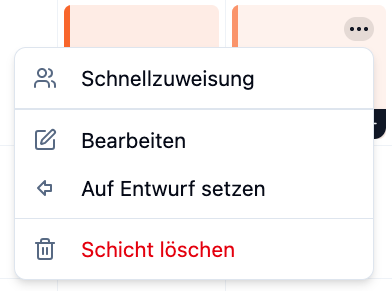
Changing Status of a Single Shift
- Open the dropdown menu (⋯) on the shift card
- Select:
- Publish – if the shift is a draft
- Set to Draft – if the shift is published
Create new shifts as drafts first if you still want to make changes. Once the planning is complete, publish all shifts at once.
Publish All Shifts in a Week
If you have multiple drafts in a week, you can publish them all at once:
- Navigate to the desired week
- Click Publish in the top right corner next to the search
- The number of drafts is shown as a badge
After publishing, affected employees are automatically notified.
The button only publishes drafts from the currently displayed week. For other weeks, navigate there first.
Drag & Drop: Moving Shifts
With drag & drop, you can quickly move shifts to another day or employee.
How It Works
- Click on a shift and hold the mouse button
- Drag the shift to the desired target (different day, different employee, different department)
- Release the mouse button to drop the shift
Where Can You Move?
Depending on the view, you can drop shifts differently:
| View | Move to... |
|---|---|
| Employee view | Different day, different employee |
| Department view | Different day, different department |
While dragging, the shift is displayed slightly rotated and enlarged. The target area is highlighted when you hover over it.
Drag & Copy: Copying Shifts
Instead of moving a shift, you can also copy it. This lets you quickly create similar shifts on multiple days.
Keyboard Shortcut
| System | Key While Dragging |
|---|---|
| Mac | Hold ⌥ Alt key |
| Windows/Linux | Hold Ctrl key |
How to Copy a Shift
- Hold the modifier key (Alt/Ctrl)
- Click on a shift and drag it to the target
- Release – the shift is copied, not moved
What Gets Copied?
| Element | Copied |
|---|---|
| Title & description | ✓ |
| Start and end time | ✓ |
| Work area | ✓ |
| Assigned employees | ✓ |
| Required employees | ✓ |
| Open shift (flag) | ✓ |
| Status | As Draft |
Copied shifts are always created as drafts. This allows you to adjust them before publishing.
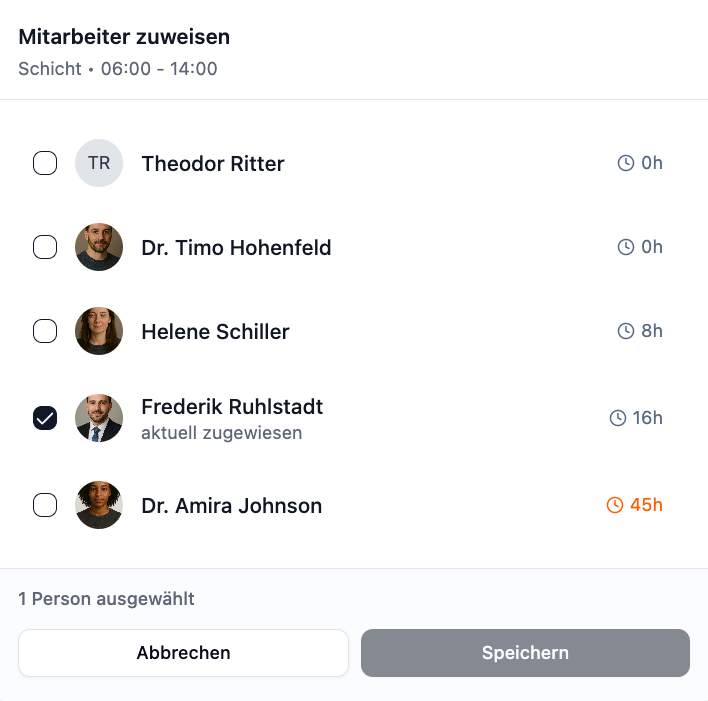
Quick Assign
With Quick Assign, you can assign multiple employees to a shift at once – with an overview of availability and weekly hours.
Quick Assign is available from the Plus plan.
How to Open Quick Assign
- Click on a shift
- Open the dropdown menu (⋯)
- Select Quick Assign
What You See
For each employee in the work area, the following is displayed:
| Information | Description |
|---|---|
| Checkbox | Select/deselect employee |
| Name | Employee name |
| Availability | Badges for absences or unavailabilities |
| Weekly hours | Current vs. target hours with color indicator |
Weekly Hours Color Coding
| Color | Meaning |
|---|---|
| Gray | Employee has capacity available |
| Yellow | Employee is slightly over the limit |
| Red | Employee is over their weekly hours |
Assigning Employees
- Check the boxes for the desired employees
- Click Save
- All selected employees are assigned to the shift
The employee list is sorted by availability. Available employees with fewer weekly hours appear first.
Open Shifts
Open shifts allow employees to sign up for available shifts themselves. This reduces planning effort and gives the team more flexibility.
Creating an Open Shift
- Create a new shift or edit an existing one
- Enable the checkbox Employees can register
- Enter the number of employees needed for the shift
- Publish the shift
You can also manually assign employees while keeping the shift open for additional applications.
How Employees Sign Up
Employees see open shifts on their Dashboard in the "Open Shifts" card:
- Employee opens the dashboard
- Sees available open shifts from their work areas
- Clicks Sign up for this shift – is immediately registered
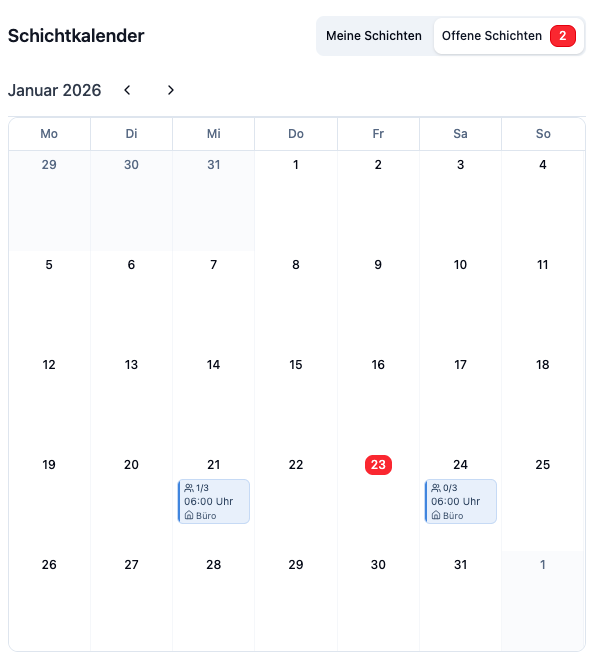
Capacity Indicator
Each open shift shows the current staffing level:
| Display | Meaning |
|---|---|
| 2/3 | 2 of 3 required employees are registered |
| 3/3 | Shift is fully staffed – no more applications possible |
Practical Examples
Dr. Schmidt's Practice is planning the upcoming week.
Process:
- Create all shifts – they are automatically saved as drafts
- Assign employees and review the planning
- Navigate to the week and click Publish
- All shifts are published at once
- Employees receive a notification
Result: The week is planned and all employees are informed.
Sunny Care Home needs the same morning shift every day.
Process:
- Create the morning shift on Monday
- Hold Alt (Mac) or Ctrl (Windows)
- Drag the shift to Tuesday → a copy is created
- Repeat for all other days
Result: Identical shifts on every day without setting up each shift manually.
Dr. Weber's Dental Practice has a shift that needs 3 employees.
Process:
- Click on the shift → Dropdown → Quick Assign
- Check the availability and weekly hours of each employee
- Select 3 available employees with checkboxes
- Click Save
Result: All 3 employees are assigned with one click.
Frequently Asked Questions
Can employees see drafts?
No. Shifts in "Draft" status are only visible to admins. Employees only see published shifts.
Can I set a published shift back to draft?
Yes. Open the shift's dropdown menu and select "Set to Draft". Note: The shift will then disappear from employees' view.
What happens when copying if employees aren't in the target area?
If you copy a shift to a different work area, only employees who are also assigned to that area are included. Other assignments are removed.
Why don't I see the Quick Assign button?
Quick Assign is a Plus feature. In the Basic plan, the button is grayed out and shows an upgrade hint.
Can I move multiple shifts at once?
No, drag & drop works only for individual shifts. For recurring patterns, we recommend weekly templates.
Are employees notified when I move shifts?
Only when the status changes. Simply moving an already published shift does not trigger an automatic notification.
Summary
| Feature | Description | Availability |
|---|---|---|
| Shift status | Draft (admins only) or Published (everyone) | All plans |
| Publish all | Button publishes all drafts of the week | All plans |
| Drag & Drop | Move shifts by dragging | All plans |
| Drag & Copy | Copy shifts with Alt/Ctrl + drag | All plans |
| Quick Assign | Assign multiple employees with availability overview | Plus |
| Open Shifts | Employees can sign up for shifts themselves | All plans |
| Shift history | Complete record of all changes made to a shift | Plus |
Use draft status to prepare your planning in peace. Copy recurring shifts with Drag & Copy. Once everything is ready, publish all shifts at once – your employees will be automatically notified.